Coding N Concepts
 Add Sub Menu in Hugo Website
Guide to create a Nested Menu partial in Hugo
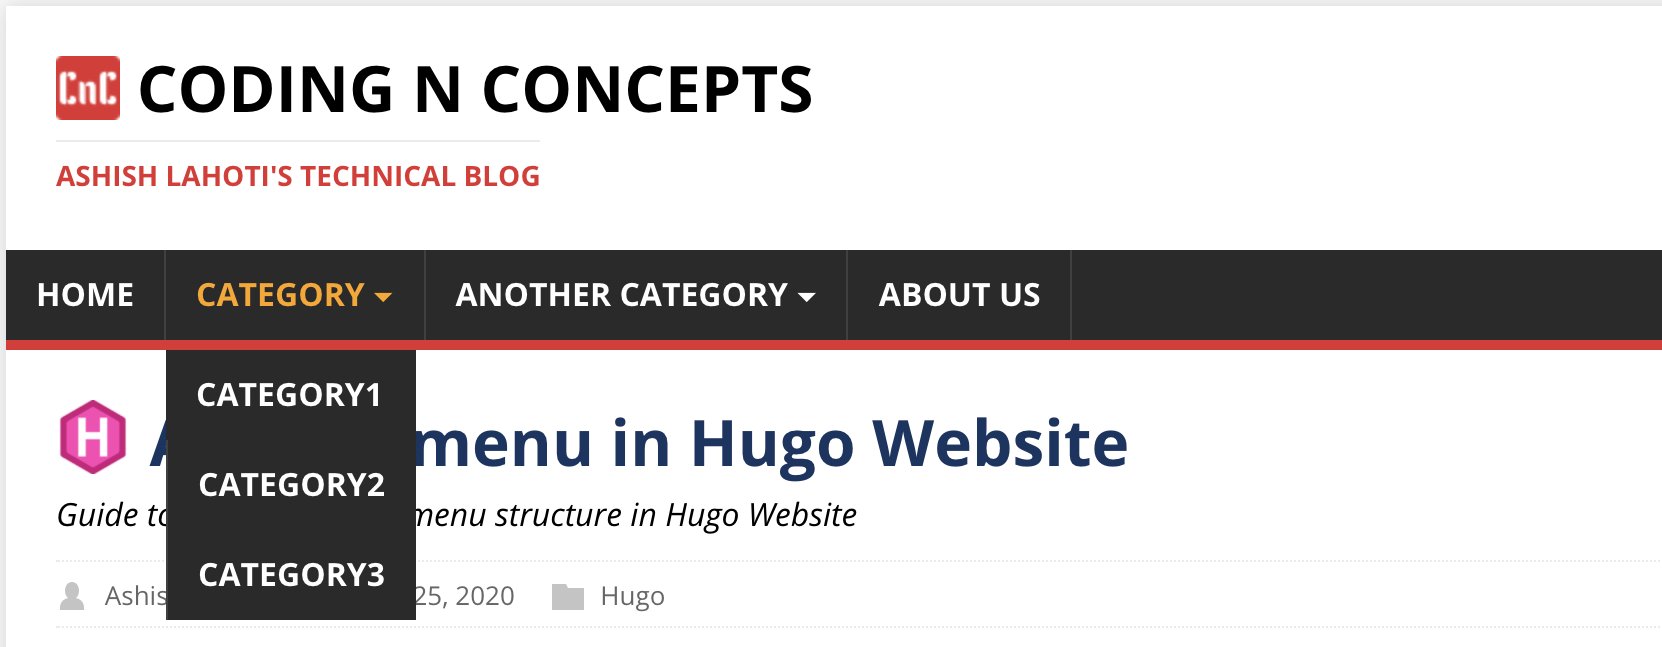
In this tutorial, we’ll learn how to add sub menu (nested menu) in Hugo Website.
Overview
When you generate a website using Hugo static site generator, you generally show a menu header on website page and other pages. Sometime you need a support for nested menu structure which is not readily available with Hugo.
You can follow these steps to support nested menu structure:-
- Update config.toml file to provide menu and submenu configuration.
- Create layouts/partials/menu.html to generate HTML from menu and submenu configuration.
- Use menu partial in either layouts/partials/header.html or layouts/_defaults/baseof.html depending upon the theme you are using.
- Finally you need to update your style.css file with menu related CSS
Follow the steps:-
Update config.toml
Let’s update config.toml with menu and submenu configuration to generate a nested menu structure like this:
config.toml
...
[menu]
  [[menu.main]]
    identifier = "home"
    name = "Home"
    url = "/"
    weight = 1
  [[menu.main]]
    identifier = "category"
    name = "Category"
    url = "/category"
    weight = 2
  [[menu.main]]
    identifier = "category1"
    name = "Category1"
    url = "/tags/category1"
    parent = "category"
    weight = 1
  [[menu.main]]
    identifier = "category2"
    name = "Category2"
    url = "/tags/category2"
    parent = "category"
    weight = 2
  [[menu.main]]
    identifier = "category3"
    name = "Category3"
    url = "/tags/category3"
    parent = "category"
    weight = 3
  [[menu.main]]
    identifier = "another-category"
    name = "Another Category"
    url = "/another-category"
    weight = 3
  [[menu.main]]
    identifier = "another-category1"
    name = "Another Category1"
    url = "/tags/another-category1"
    parent = "another-category"
    weight = 1
  [[menu.main]]
    identifier = "another-category2"
    name = "Another Category2"
    url = "/tags/another-category2"
    parent = "another-category"
    weight = 2
  [[menu.main]]
    identifier = "about"
    name = "About Us"
    url = "/about/"
    weight = 4
You should understand each field under [[menu.main]]:
- identifier should be unique name of menu within the menu structure. It is used to identify menu, submenu and their relation by hugo internally.
- name should be the name which you want to display on the menu item.
- url is a relative URL which will be opened when you click on the menu item.
- weight is for sequencing the menu items. Menu items with less weight appear first in the menu. Same is applicable for submenu, submenu items with less weight appear first in the dropdown.
- parent is used in submenu item only to tell who is the parent of the submenu. You use the identifier of the parent menu in this field.
Create/Update layouts/partials/menu.html
Now we are going to use menu and submenu configuration from config.toml file to create our menu.html partial as below:
layouts/partials/menu.html
This is the basic menu.html if you want create your own menu from scratch.
<nav class="nav">
  <ul class="menu">
    {{ range .Site.Menus.main }}
    <li class="{{ if $currentPage.HasMenuCurrent "main" . }}active{{ end }}">
      <span>{{ .Name }}</span>
      {{ if .HasChildren }}
      <span class="drop-icon" for="{{ .Name }}">▾</span>
      <ul class="sub-menu">
        {{ range .Children }}
        <li class="{{ if $currentPage.HasMenuCurrent "main" . }}active{{ end }}">
            <span>{{ .Name }}</span>
        </li>
        {{ end }}
      </ul>
      {{ end }}
    </li>
    {{ end }}
  </ul>
</nav>
This is the menu.html of my blog website created using Hugo Mainroad Theme.
{{- if .Site.Menus.main }}
<nav class="menu">
  <button class="menu__btn" aria-haspopup="true" aria-expanded="false" tabindex="0">
    <span class="menu__btn-title" tabindex="-1">{{ T "menu_label" }}</span>
  </button>
  <ul class="menu__list">
    {{- $currentNode := . }}
    {{- range .Site.Menus.main }}
    {{- if .Name }}
    {{- if .HasChildren }}
    <li class="menu__item menu__dropdown{{ if or ($currentNode.IsMenuCurrent "main" .) ($currentNode.HasMenuCurrent "main" .) }} menu__item--active{{ end }}">
      <a class="menu__link" href="{{ .URL }}">
        {{ .Pre }}
        <span class="menu__text">{{ .Name }}</span>
        <label class="drop-icon" for="{{ .Name }}">▾</label>
        {{ .Post }}
      </a>
      <input type="checkbox" id="{{ .Name }}">
      <ul class="submenu__list">
        {{ range .Children }}
          <li class="menu__item{{ if or ($currentNode.IsMenuCurrent "main" .) ($currentNode.HasMenuCurrent "main" .) }} menu__item--active{{ end }}">
          <a class="menu__link" href="{{ .URL }}">
            {{ .Pre }}
            <span class="menu__text">{{ .Name }}</span>
            {{ .Post }}
          </a>
          </li>
        {{ end }}
      </ul>
    </li>
    {{- else }}
    <li class="menu__item{{ if or ($currentNode.IsMenuCurrent "main" .) ($currentNode.HasMenuCurrent "main" .) }} menu__item--active{{ end }}">
      <a class="menu__link" href="{{ .URL }}">
        {{ .Pre }}
          <span class="menu__text">{{ .Name }}</span>
        {{ .Post }}
      </a>
    </li>
    {{- end }}
    {{- end }}
    {{- end }}
  </ul>
</nav>
{{ else -}}
<div class="divider"></div>
{{- end }}
Note that if you are using the theme, then you might already have menu.html partial. In that case just update the existing menu.html partial. Things to note in the above partial is use of {{- if .HasChildren }} condition to check if menu has submenu children or not. If it is having submenu children, then we loop them through using {{ range .Children }}.
Also, note that you might need to add classes to the HTML elements as per the theme you are using.
Once you create or update your layouts/partials/menu.html, import this partial in either layouts/partials/header.html or layouts/defaults/baseof.html depending upon the theme you are using, if not imported.
Create/Update static/css/style.css
This is the most important part of nested menu structure. I struggled a lot to create the right CSS for above menu.html partial. Here is relevant part of the CSS which you need to add in your existing CSS for nested menu structure to work.
static/css/style.css
/* Main menu */
.no-js .menu__btn {
  display: none;
}

.menu__btn {
  display: block;
  width: 100%;
  padding: 0;
  font: inherit;
  color: #fff;
  background: #2a2a2a;
  border: 0;
  outline: 0;
}

.menu__btn-title {
  position: relative;
  display: block;
  padding: 10px 15px;
  padding: 0.625rem 0.9375rem;
  font-weight: 700;
  text-align: right;
  text-transform: uppercase;
  cursor: pointer;
  -webkit-user-select: none;
  -moz-user-select: none;
  -ms-user-select: none;
  -o-user-select: none;
  user-select: none;
}

:focus > .menu__btn-title {
  box-shadow: inset 0 0 1px 3px #e22d30;
}

button:not(:-moz-focusring):focus > .menu__btn-title {
  box-shadow: none;
}

.menu__btn:focus,
.menu__btn-title:focus {
  outline: 0;
}

.js .menu__btn--active {
  color: #e22d30;
}

.menu__list,
.submenu__list {
  list-style: none;
  background: #2a2a2a;
}

.menu__item {
  transition: background-color .25s ease-out;
}

.menu__item:hover > a {
  color: #ffa500;
}

.menu__item:first-child {
  border: 0;
}

.menu__item--active {
  background: #e22d30;
}

.menu__link {
  display: block;
  padding: 10px 15px;
  padding: 0.625rem 0.9375rem;
  font-weight: 700;
  color: #fff;
  text-transform: uppercase;
}

.menu__list .menu__item .submenu__list {
  background: #2a2a2a;
  visibility: hidden;
  opacity: 0;
  position: absolute;
  max-width: 15rem;
  transition: all 0.5s ease;
  border-top: 5px solid #e22d30;
  display: none;
}

.menu__item.menu__dropdown input[type="checkbox"] {
  display: none;
}

.menu__list .menu__item:hover > .submenu__list,
.menu__list .menu__item:focus-within > .submenu__list,
.menu__list .menu__item .submenu__list:hover,
.menu__list .menu__item .submenu__list:focus {
  visibility: visible;
  opacity: 1;
  display: block;
}

.menu__link:hover {
  color: #fff;
}

.js .menu__list {
  position: absolute;
  z-index: 1;
  width: 100%;
  visibility: hidden;
  -webkit-transform: scaleY(0);
  transform: scaleY(0);
  -webkit-transform-origin: top left;
  transform-origin: top left;
}

.js .menu__list--active {
  visibility: visible;
  border-top: 1px solid rgba(255, 255, 255, 0.1);
  border-bottom: 1px solid rgba(255, 255, 255, 0.1);
  -webkit-transform: scaleY(1);
  transform: scaleY(1);
}

.menu__list--transition {
  transition: visibility 0.15s ease, transform 0.15s ease, -webkit-transform 0.15s ease;
}

@media screen and (min-width: 767px) {
  .menu {
    border-bottom: 5px solid #e22d30;
  }
  .menu__btn {
    display: none;
  }
  .menu__list, .js .menu__list {
    position: relative;
    display: -webkit-flex;
    display: flex;
    -webkit-flex-wrap: wrap;
    flex-wrap: wrap;
    visibility: visible;
    border: 0;
    -webkit-transform: none;
    transform: none;
	}
  .menu__item {
    border-left: 1px solid rgba(255, 255, 255, 0.1);
  }
}

@media screen and (max-width: 767px) {
  .menu__item.menu__dropdown .drop-icon {
    position: absolute;
    right: 1rem;
    top: auto;
    width: 50%;
    text-align: right;
  }
  .menu__item.menu__dropdown input[type="checkbox"] + .submenu__list {
    display: none;
  }
  .menu__item.menu__dropdown input[type="checkbox"]:checked + .submenu__list {
    border: none;
    padding-left: 20px;
    visibility: visible;
    opacity: 1;
    display: block;
    position: relative;
    max-width: 100%;
  }
}

@media screen and (max-width: 620px) {
  .menu__item.menu__dropdown .drop-icon {
    position: absolute;
    right: 1rem;
    top: auto;
  }
  .menu__item.menu__dropdown input[type="checkbox"] + .submenu__list {
    display: none;
  }
  .menu__item.menu__dropdown input[type="checkbox"]:checked + .submenu__list {
    border: none;
    padding-left: 20px;
    visibility: visible;
    opacity: 1;
    display: block;
    position: relative;
    max-width: 100%;
  }
}
Import this CSS in either layouts/partials/header.html or layouts/defaults/baseof.html depending upon the theme you are using, if not imported.
{{ $style := resources.Get "css/style.css" | resources.ExecuteAsTemplate "css/style.css" . -}}
Create/Update static/js/menu.js
If you don’t have menu.js javascript in your existing theme, then use this instead:-
static/js/menu.js
'use strict';

(function iifeMenu(document, window, undefined) {
	var menuBtn = document.querySelector('.menu__btn');
	var	menu = document.querySelector('.menu__list');

	function toggleMenu() {
		menu.classList.toggle('menu__list--active');
		menu.classList.toggle('menu__list--transition');
		this.classList.toggle('menu__btn--active');
		this.setAttribute(
			'aria-expanded',
			this.getAttribute('aria-expanded') === 'true' ? 'false' : 'true'
		);
	}

	function removeMenuTransition() {
		this.classList.remove('menu__list--transition');
	}

	if (menuBtn && menu) {
		menuBtn.addEventListener('click', toggleMenu, false);
		menu.addEventListener('transitionend', removeMenuTransition, false);
	}
}(document, window));
Import this JS in either layouts/partials/header.html or layouts/defaults/baseof.html depending upon the theme you are using, if not imported.
<script async defer src="{{ "js/menu.js" | relURL }}"></script>
Please note that I have kept CSS and JS files in static folder. This is how we specify that in config.toml configuration:-
config.toml
assetDir = "static"
Posts to submenu mapping using Tags
Now say you have created menu and submenu structure and now want to do mapping of your posts under each menu and submenu. I generally do it using tags.
Say, I want to map my posts under Category ➞ Category1, I do that by adding tag in frontmatter like this:
myblogpost.md
---
tags:
  - "category1"
---
Now Hugo will map you post to the URL /tags/category1. You can use this URL to map submenu in config.toml
config.toml
  [[menu.main]]
    identifier = "category1"
    name = "Category1"
    url = "/tags/category1"
    parent = "category"
    weight = 1
Conclusion
Please note that I am currently using Hugo Mainroad Theme so this example should just work fine for Mainroad theme. For other themes, you need to put extra effort in terms of creating menu.html partial and right CSS for nested menu structure. I hope this tutorial will give you the basic idea in which direction you need to go.
Please comment in case you find any issue to follow the tutorial. Thanks for reading.