Coding N Concepts
 Deployment of Spring Boot Microservices using Docker and Jenkins
In this article, we’ll learn how to automate the build & deployment of Spring boot based microservices using Docker, Jenkins, Gradle and Git.
Overview
It is essential in microservice environment to automate the build, test, containerize, deploy and run phases of a Spring boot based applications.
CI/CD (Continuous integration and continuous deployment) is an important aspect of microservices, which can be achieved using DevOps tools such as Gradle, Docker, Jenkins, and Git.
- Gradle provides gradle task such as build, test, docker, and dockerRun for spring boot microservice
- Docker provides ability to containerize (docker image) our spring boot microservice
- Jenkins build the CI/CD pipeline and stages to build and deploy our spring boot microservice
- Git triggers the Jenkins job when any source-code is committed to the Git repository.
Sounds Complicated? Don’t worry, We’ll learn everything step by step by using all these tools in our local machine.
Spring Boot Microservices
We’re created our two Spring boot based microservices in a single GitHub repository github/springboot-microservices as modules also called as Git Monorepo. You can clone or download this repository and setup in your favourite IDE to follow along.
It is recommended to use Git Monorepo for smaller applications having 5 to 10 microservices for faster development and collaboration.

Project structure for Spring Boot based Microservices
About our project structure in the monorepo,
review-servicemicroservice provide APIs and execute database CRUD operations on review details of a specific product.product-servicemicroservice provide APIs, fetch product details from thirdparty service, and fetch review details fromreview-servicecommon-libraryis used by both microservices and provides common configuration for api logging, security, documentation, exception handling, etc. You can ignore this project from automation perspective.build.gradleis used for dependency management, to build and run individual microservices.settings.gradleis used to manage modules in Monorepo.Dockerfileis set of instructions to build docker image using docker commandJenkinsfiledefine deployment pipeline and used by jenkins to trigger deployment job
Assume that our spring boot based microservices are running on following server port:
| Microservice | Running on.. |
|---|---|
| product-service | http://localhost:8081 |
| review-service | http://localhost:8082 |
We can configure the port for each microservice using server.port property in application.yml file.
Let’s deep dive into the automation of build and deployment of these microservices.
Dockerfile
Dockerfile is essentially a set of instruction describing how to build a Docker image.
We’ve created a Dockerfile in our product-service project to dockerize our microservice:-
FROM adoptopenjdk/openjdk11:alpine-jre

ARG APP_NAME="product-service"
ARG APP_VERSION="0.0.1"
ARG JAR_FILE="/build/libs/${APP_NAME}-${APP_VERSION}.jar"

COPY ${JAR_FILE} app.jar
ENTRYPOINT ["java","-jar", "app.jar"]
Let’s understand the meaning of each instruction:-
- FROM instructs to build Docker image on top of base image, in this case use OpenJDK 11 image
- ARG is used to define variables, which can be passed as arguments at runtime to build docker image, in this case defined three variables -
APP_NAME,APP_VERSION, andJAR_FILE.
These variables can be used in other variables and instructions, in this caseJAR_FILEis used to provide Spring boot jar file path and used in COPY instruction - COPY allows us to copy a file into the docker image, in this case the application JAR file
- ENTRYPOINT describes execution command to start a docker container, in this case execute the JAR to run a spring boot application
How to run this Dockerfile? Keep Reading…
Install Docker Desktop
You need docker command tool to build and run docker image from Dockerfile and for this, you need to install Docker Desktop.
To install Docker Desktop on macOS using Homebrew package manager:-
brew install --cask docker
Once the Docker Desktop is installed, you are ready to execute docker commands. Let’s test it:-
$any-path % docker --version
Docker version 20.10.8, build 3967b7d
Note: Make sure that Docker Desktop is running in the background in your local machine otherwise docker commands result into error
Build and Run Docker Image
- To build a docker image for microservice
product-service, Go to the location, where you haveDockerfileand run following command:-$springboot-microservices/product-service % docker build -t com.example/product-service . [+] Building 15.4s (8/8) FINISHED => [internal] load build definition from Dockerfile => => transferring dockerfile: 37B => [internal] load .dockerignore => => transferring context: 2B => [internal] load metadata for docker.io/adoptopenjdk/openjdk11:alpine-jre => [auth] adoptopenjdk/openjdk11:pull token for registry-1.docker.io => [internal] load build context => => transferring context: 115B => [1/2] FROM docker.io/adoptopenjdk/openjdk11:alpine-jre@sha256:f66b966de21575a3d2b589605c8284c8ad8e06c0b9ed47d24fa1754885f461ad => [2/2] COPY /build/libs/product-service-0.0.1.jar app.jar => exporting to image => => exporting layers => => writing image sha256:6da82c22c380fd4849949a8cf79b3708b5c1925ac9937e81344e30451626faef => => naming to com.example/product-service - To run the docker container from image created in step 1, run following command:-
$any-path % docker run -d -p 8081:8081 -e "SPRING_PROFILES_ACTIVE=dev" com.example/product-service:latest
Similar steps can be performed for review-service microservice as well to build and run com.example/review-service image.
Push Docker Image to Docker Hub
Though we can build and run the Docker image from our local machine. It is a good practice to maintain all our Docker images in centralized repository like DockerHub similar to how we manage our source code in GitHub or BitBucket repository.
Next we are going to push the docker image to remote DockerHub repository by following these steps:-
- Sign up and create a free DockerHub account for personal use, if you don’t have one. You will get a unique DockerId for your account for e.g.
aklahoti - Next, you login to your DockerHub account and create a repository with name and description for e.g.
product-service - At this stage, our account and repository is created. We’re going to push the images to this remote repository using
dockercommand that means our Docker Desktop should be running in our local machine. - How to authenticate before pushing to remote repository? Go to Docker Desktop -> Images -> Remote Repositories, and Sign in with DockerId and password of your DockerHub account. Now all
dockerpush commands will be authenticated automatically. - Alternatively you can use following command to login, it will prompt for username and password:-
$any-path % docker login - All set! Run the command to tag your local docker image to remote docker image:-
$any-path % docker tag com.example/product-service:latest aklahoti/product-service/0.0.1 - Now run the command to push to remote docker image to DockerHub Repository:-
$any-path % docker image push aklahoti/product-service:0.0.1
The push refers to repository [docker.io/aklahoti/product-service]
8feb5df7f49a: Layer already exists
1a94ead4570f: Layer already exists
b59055dc22e8: Layer already exists
e2eb06d8af82: Layer already exists
0.0.1: digest: sha256:de5d73282c0ed327f1c054be90fd5e52938f65b6cb84e4e2d696b94e1a89f102 size: 1163
Please note that at this point, we have two docker images of our product-service microservice. one is com.example/product-service:latest in our local machine and another one is aklahoti/product-service/0.0.1 in remote DockerHub repository. We’ve kept different names for these two images to differentiate between local vs remote.
Docker Desktop running in your local machine in well aware of these two docker images so you can use them alternatively. If you use remote docker image, Docker Desktop pull the image from DockerHub automatically.
Similar steps can be performed for review-service microservice as well.
docker-compose.yaml
Docker Compose is quite useful to build and run docker images of multiple microservices using single command.
Let’s create a Docker Compose configuration file docker-compose.yaml in the root directory $springboot-microservices to build and run our both microservices product-service and review-service using a single command:-
version: "3.8"

services:
  product-service:
    image: com.example/product-service:latest
    container_name: product-service
    build:
      context: ./product-service
      args:
        - APP_NAME=product-service
        - APP_VERSION=0.0.1
    environment:
      SPRING_PROFILES_ACTIVE: dev
    expose:
      - 8081
    ports:
      - 8081:8081
  review-service:
    image: com.example/review-service:latest
    container_name: review-service
    build:
      context: ./review-service
      args:
        - APP_NAME=review-service
        - APP_VERSION=0.0.1
    environment:
      SPRING_PROFILES_ACTIVE: dev
    expose:
      - 8082
    ports:
      - 8082:8082
You can use remote image aklahoti/product-service/0.0.1 instead of local image com.example/product-service:latest in docker-compose.yaml as well.
Once Docker Compose configuration is in place, You can build and run the docker images of both the microservices using single command:-
$springboot-microservices % docker-compose up
You will see that images for both the microservices are created with name com.example/product-service and com.example/review-service and docker containers are up and running (showing IN USE) for both the microservices at port 8081 and 8082 respectively in Docker Desktop’s images menu like this:-
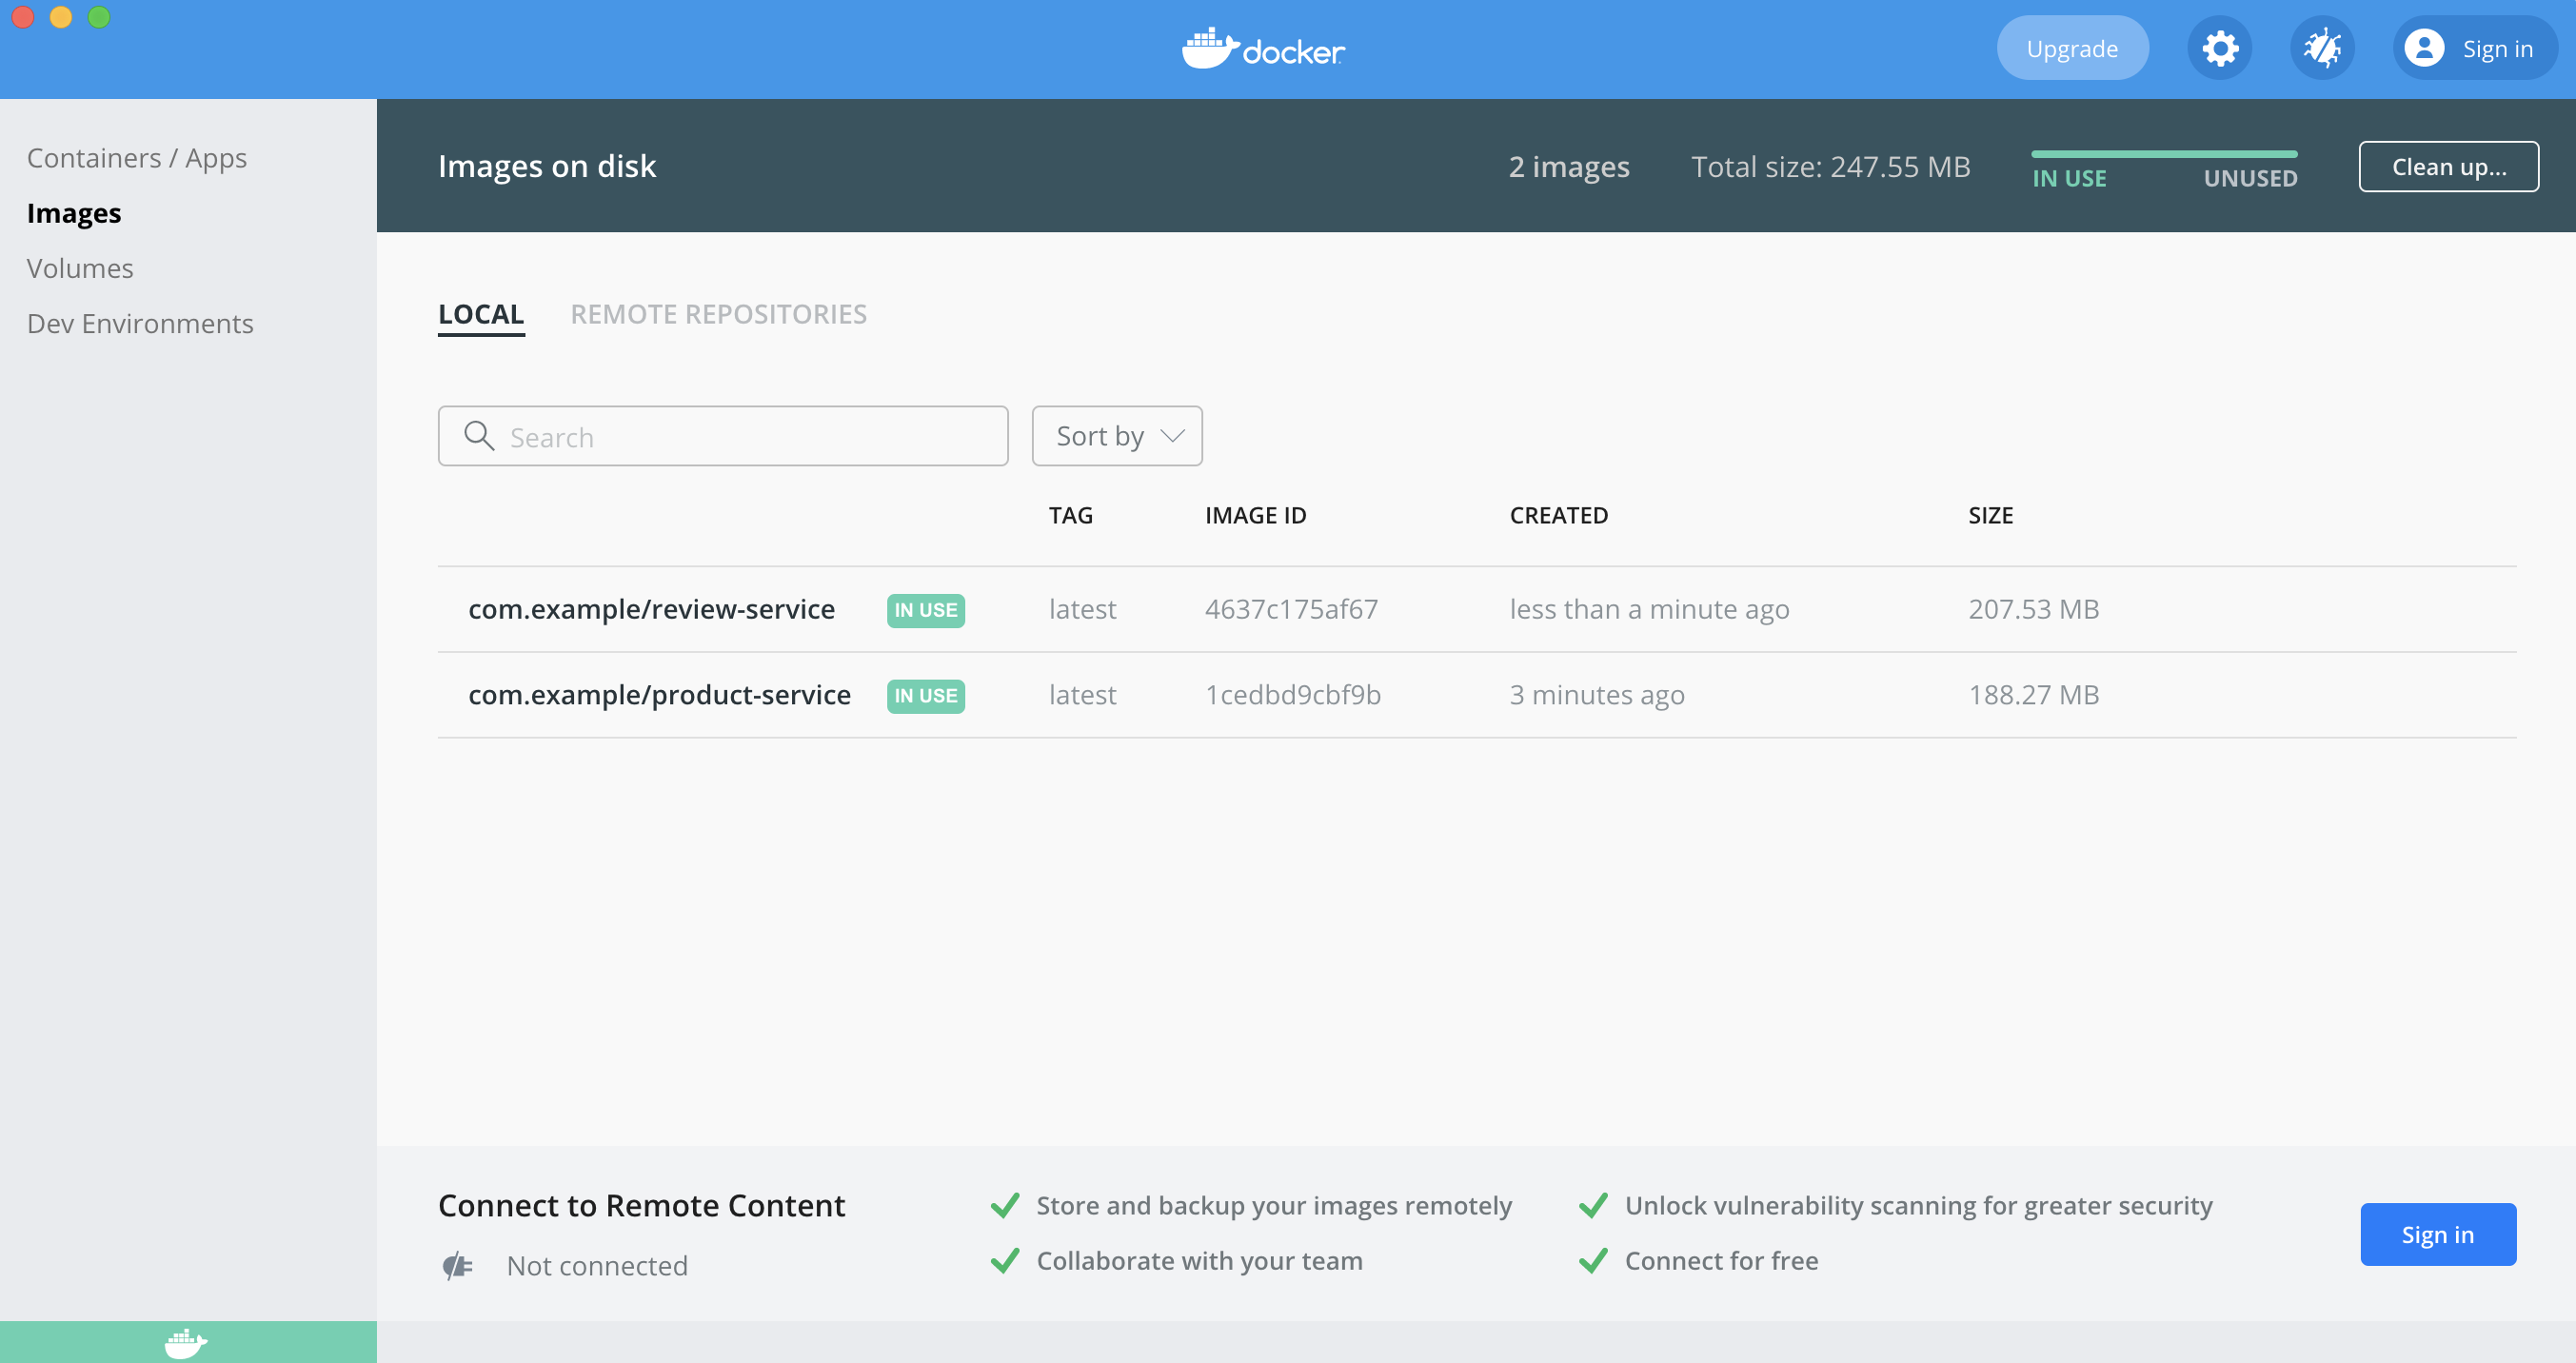
Docker Desktop
You can access the running Docker containers from Docker Desktop’s Containers/Apps menu.
To bring all running docker containers of microservices down:-
$springboot-microservices % docker-compose down
build.gradle
Next, we are going the build and run the docker image by executing a Gradle task.
Gradle Plugin for Docker
For this, we are going to use Palantir Gradle Docker plugin which expose useful gradle tasks like docker to build docker image and dockerRun to run it.
plugins {
    id 'com.palantir.docker' version '0.26.0'
    id 'com.palantir.docker-run' version '0.26.0'
}
Build Docker image using Gradle
We provide additional configuration to docker gradle task to describe, how to build docker image:-
group = 'com.example'
String imageName = "${project.group}/${project.name}"
docker {
    dockerfile project.file('Dockerfile')
    name imageName
    files bootJar.archiveFile.get()
    buildArgs(['JAR_FILE': "${bootJar.archiveFileName.get()}"])
}
Let’s understand the configuration:-
- imageName is a variable to be used at multiple places, in this case define the name of the docker image i.e. “com.example/product-service”
- docker is the gradle task name, for which we are proving configuration
- dockerfile is the Dockerfile to use for building the image; defaults to project.file(‘Dockerfile’) and must be a file object
- files is a list of files to be included in the Docker build context. The specified files are used in COPY instructions of Dockerfile. We are referencing
bootJar.archiveFile.get()to get the build jar file. - buildArgs are arguments to be passed to Dockerfile. We are passing
JAR_FILEargument to be used in COPY instruction of Dockerfile
Execute the gradle task to build the image:-
$springboot-microservices/product-service % gradle docker
Note: Make sure that Docker Desktop is running in the background in your local machine otherwise it will complain that docker daemon is not running.
Run Docker image using Gradle
We provide additional configuration to dockerRun gradle task to describe, how to run docker container from image:-
String imageName = "${project.group}/${project.name}"
dockerRun {
    name "${project.name}-container"
    image imageName
    ports '8081:8081'
    env 'SPRING_PROFILES_ACTIVE': 'dev'
    daemonize true
    clean true
}
Let’s understand the configuration:-
- dockerRun is the gradle task name, for which we are proving configuration
- name is the name to use for the docker container, in this case “product-service-container”
- image is the docker image to use to build the docker container, in this case “com.example/product-service”
- ports configuration is
local:container, for e.g. 8081:8081 means docker container will run on port 8081 and it binds to port 8081 of your local machine. In simple words, you will able to access docker containerhttp://product-service:8081from your local machinehttp://localhost:8081 - env is environment variables to be passed to docker container
- daemonize defaults to
trueto daemonize the container after starting - clean default to
false. It is good to set clean totruewhile testing in local machine, which automatically delete the container when you stop it.
Execute the gradle task to run docker container from the image:-
$springboot-microservices/product-service % gradle dockerRun
Note: Make sure that Docker Desktop is running in the background in your local machine otherwise it will complain that docker daemon is not running.
build.gradle
A typical build.gradle with docker plugins and configurations looks like this:-
plugins {
    id 'org.springframework.boot' version '2.5.0'
    id 'io.spring.dependency-management' version '1.0.11.RELEASE'
    id 'java'
    id 'com.palantir.docker' version '0.26.0'
    id 'com.palantir.docker-run' version '0.26.0'
}

group = 'com.example'
version = '0.0.1'
sourceCompatibility = '11'

repositories {
    mavenCentral()
}

ext {
    set('springCloudVersion', "2020.0.3")
}

dependencies {
    implementation 'org.springframework.boot:spring-boot-starter-web'
    implementation 'org.springframework.cloud:spring-cloud-starter-openfeign'
    implementation 'org.springdoc:springdoc-openapi-ui:latest.release'
    implementation 'commons-io:commons-io:2.6'
    implementation project(':common-library')

    testImplementation 'org.springframework.boot:spring-boot-starter-test'
    testImplementation 'org.springframework.cloud:spring-cloud-starter-contract-stub-runner'

    compileOnly 'org.projectlombok:lombok:1.18.20'
    annotationProcessor 'org.projectlombok:lombok:1.18.20'
}

dependencyManagement {
    imports {
        mavenBom "org.springframework.cloud:spring-cloud-dependencies:${springCloudVersion}"
    }
}

test {
    useJUnitPlatform()
}

String imageName = "${project.group}/${project.name}"
docker {
    dockerfile file('Dockerfile')
    name imageName
    files bootJar.archiveFile.get()
    buildArgs(['JAR_FILE': "${bootJar.archiveFileName.get()}"])
}
dockerRun {
    name "${project.name}-container"
    image imageName
    ports '8081:8081'
    env 'SPRING_PROFILES_ACTIVE': 'dev'
    daemonize true
    clean false
}
Jenkinsfile
Jenkinsfile is essentially defines the automation pipeline with various stages such as build, test, dockerize, run docker container etc. It is used by Jenkins to trigger a job as per the defined pipeline.
Let’s create Jenkinsfile in the root of product-service project:-
pipeline {
    agent any
    triggers {
        pollSCM '* * * * *'
    }
    stages {
        stage('Build') {
            steps {
                sh 'gradle assemble'
            }
        }
         stage('Test') {
            steps {
                sh 'gradle test'
            }
        }
        stage('Build Docker Image') {
            steps {
                sh 'gradle docker'
            }
        }
        stage('Run Docker Image') {
            steps {
                sh 'gradle dockerRun'
            }
        }
    }
}
Please note that this is a Jenkinsfile to run jenkins job in your local machine. The production version may have few more and complex stages for e.g. you would be pushing the docker images to docker hub of your organization.
Install Jenkins
You should install Jenkins to run Jenkinsfile in your local machine.
To install Jenkins on macOS using Homebrew package manager:-
brew install jenkins
Start & Stop Jenkins
Using Homebrew
To start, stop, restart, and upgrade Jenkins using Homebrew:-
brew services start jenkins
brew services stop jenkins
brew services restart jenkins
brew upgrade jenkins
Using Command Line
To start jenkins from command line:-
jenkins
To stop jenkins running from command line, press CTRL+C
Using browser URL
By default, jenkins runs at http://localhost:8080
To stop, restart and reload jenkins using URL http://localhost:8080/[command] where [command] can be:-
exit
restart
reload
Create Jenkins pipeline from Jenkinsfile
Once you install and start Jenkins successfully. You should be able to access Jenkins from browser http://localhost:8080. It will ask you to provide admin username and password. It will also ask you to install recommended plugins. Just finish all these steps.
You source code should be checked into an accessible source code repository such as github. Please create a free account and check in your code to a repository if you don’t have one. This is a prerequisite to create a Jenkins pipeline.
All set! Now is the time to create Jenkins pipeline. Follow these steps:-
- Go to the Jenkins Dashboard
- Click on New Item from menu
- Enter an item name for e.g.
microservice-pipelineand select Pipeline from options. Click OK. - You will see a dialogue with four tabs: General, Build Triggers, Advance Project Options, and Pipeline.
- You can skip General, Build Triggers and Advance Project Options tabs. No configuration required.
- Pipeline tab:
- Choose Definition:
Pipeline Script from SCM - SCM:
Git - Repositories/Repository URL: Give repository name for e.g.
https://github.com/ashishlahoti/springboot-microservices - Repositories/Credentials: Give username and password to access the repository
- Branched to build/Branch Specifier: Give branch name from where you want jenkins to fetch Jenkinsfile for e.g.
*/main - Script path: Give path of Jenkinsfile in the repository for e.g.
product-discovery/Jenkinsfile
- Choose Definition:
- Click on Save. Congrats your pipeline is created.
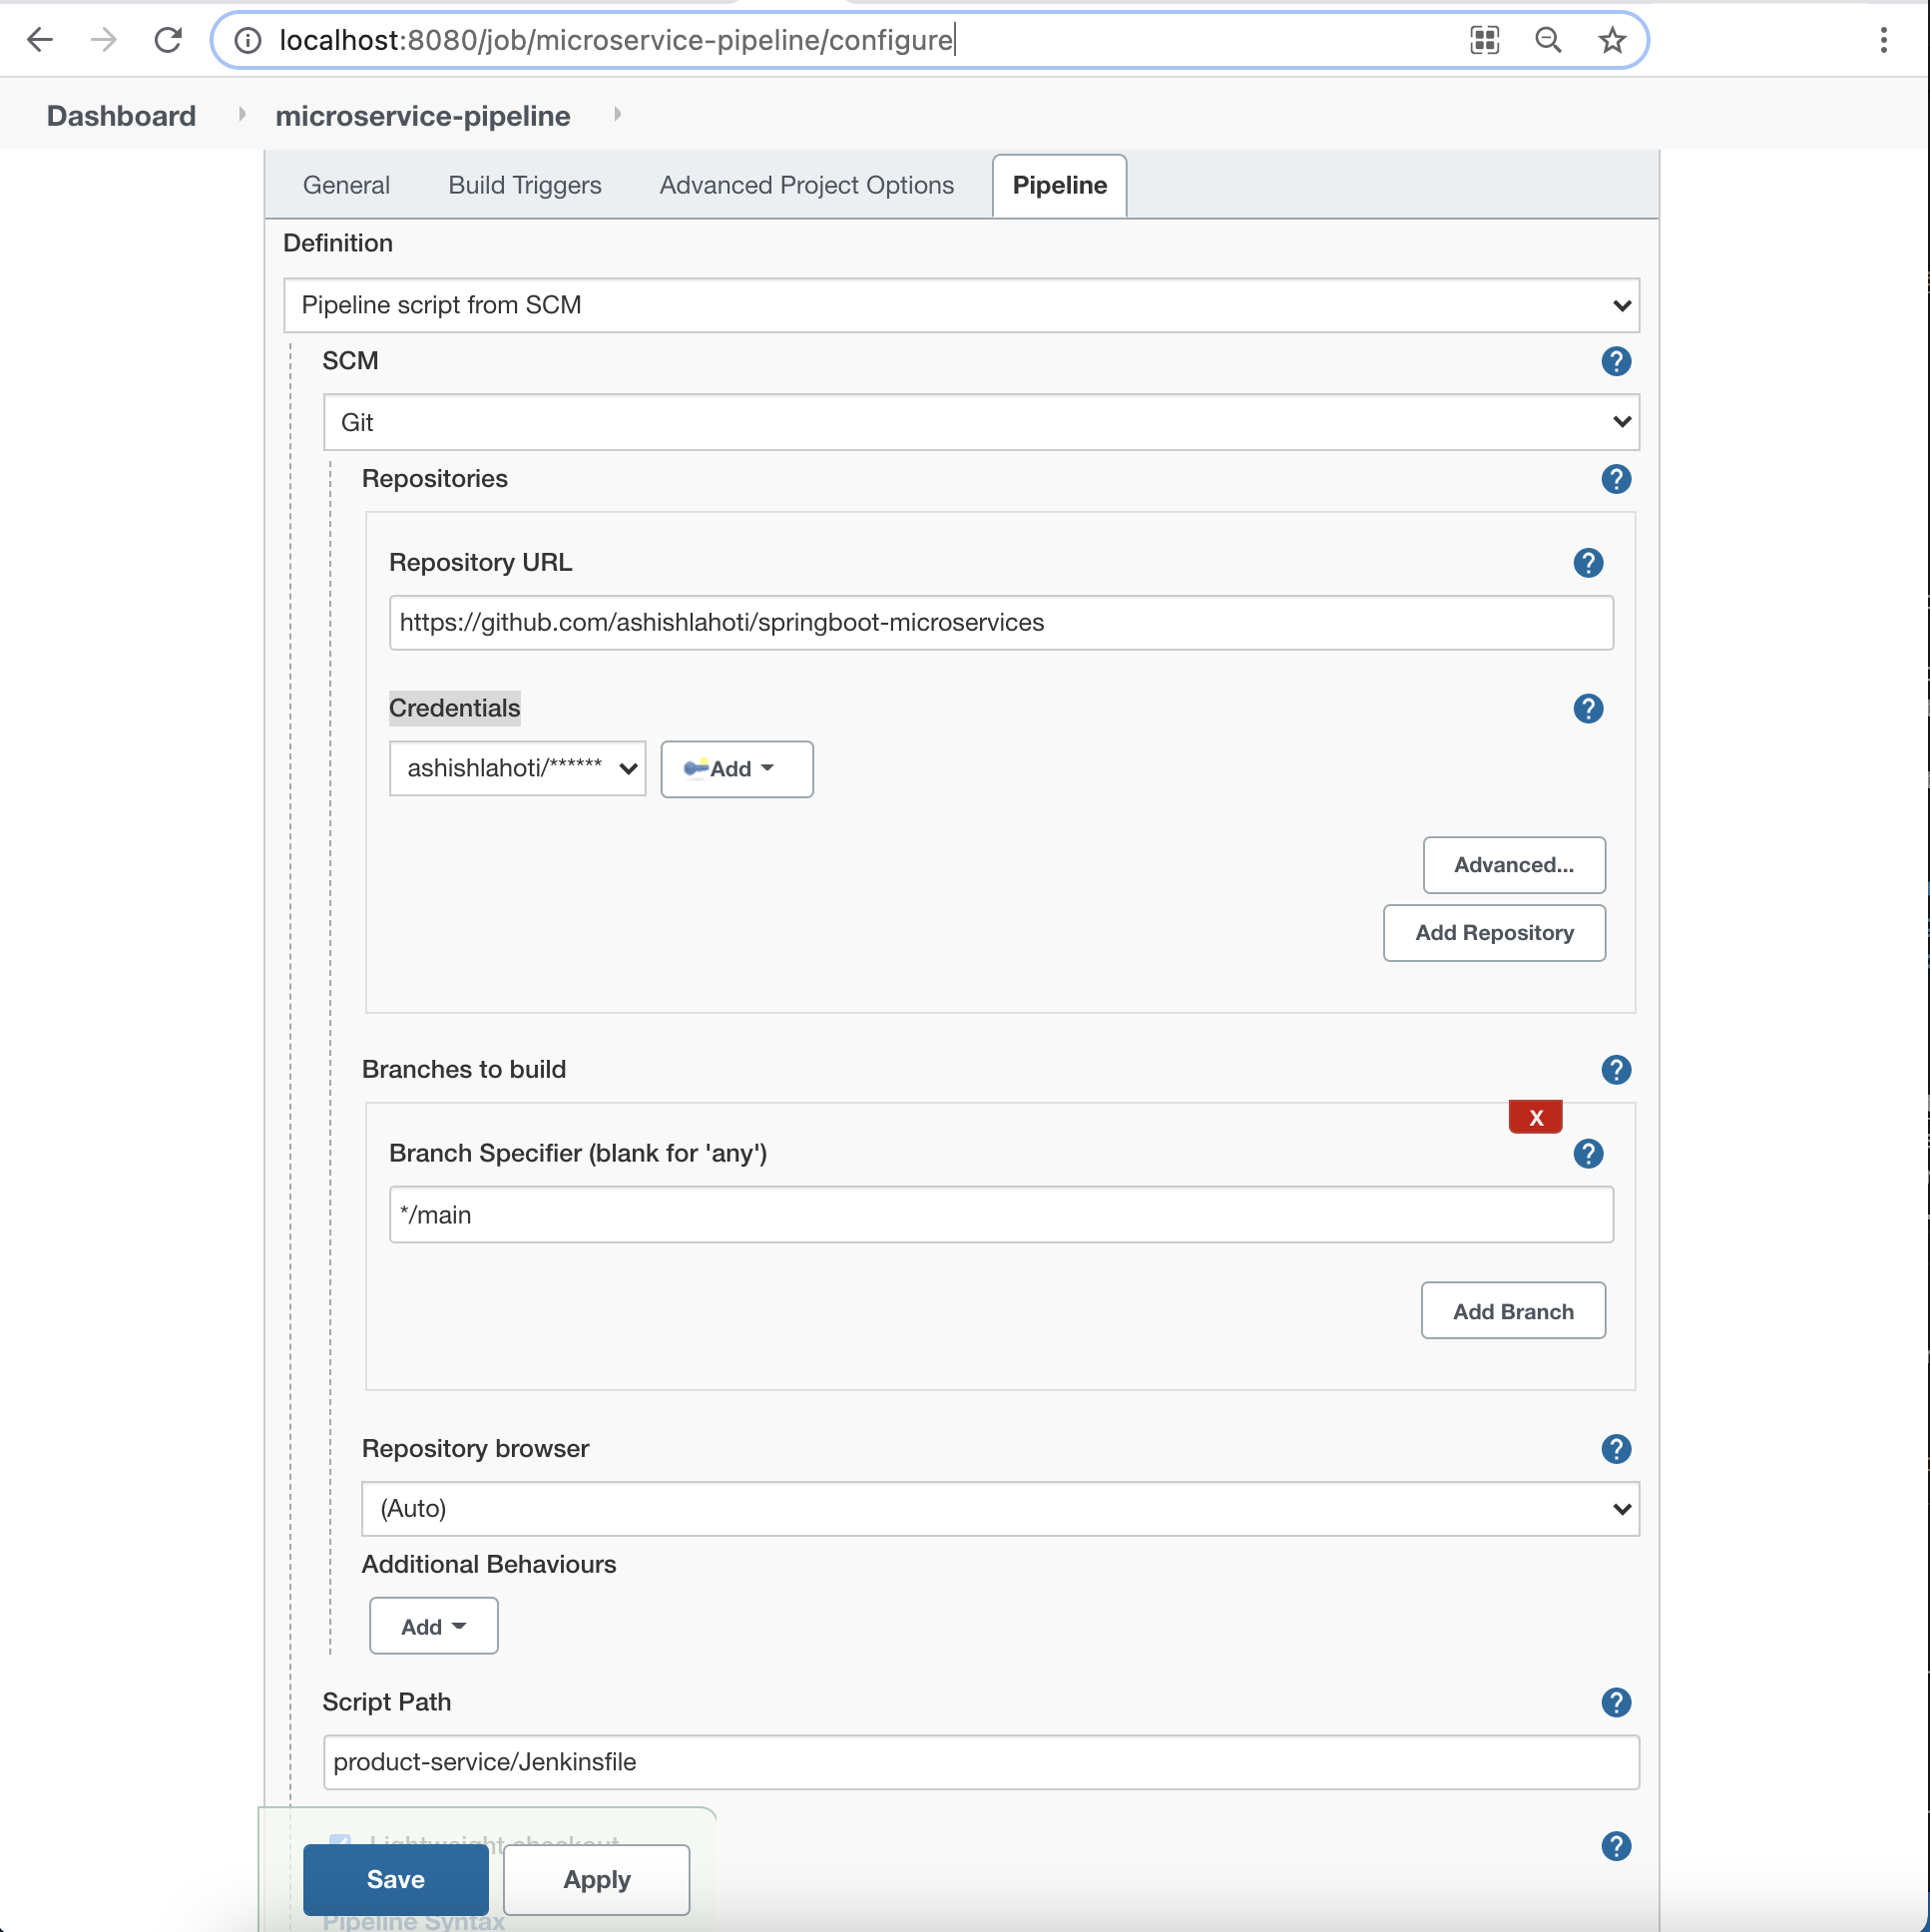
Create Jenkins pipeline from Jenkinsfile
Build Jenkins pipeline
Once you create a pipeline. You see it on Jenkins dashboard. Click on it. Alternatively go to http://localhost:8080/job/microservice-pipeline/
Click on the Build Now option to run Jenkins pipeline. You will see your build pipeline and stages like this:-
Note: Make sure that Docker Desktop is running in the background in your local machine otherwise build will fail and say that docker daemon is not running.
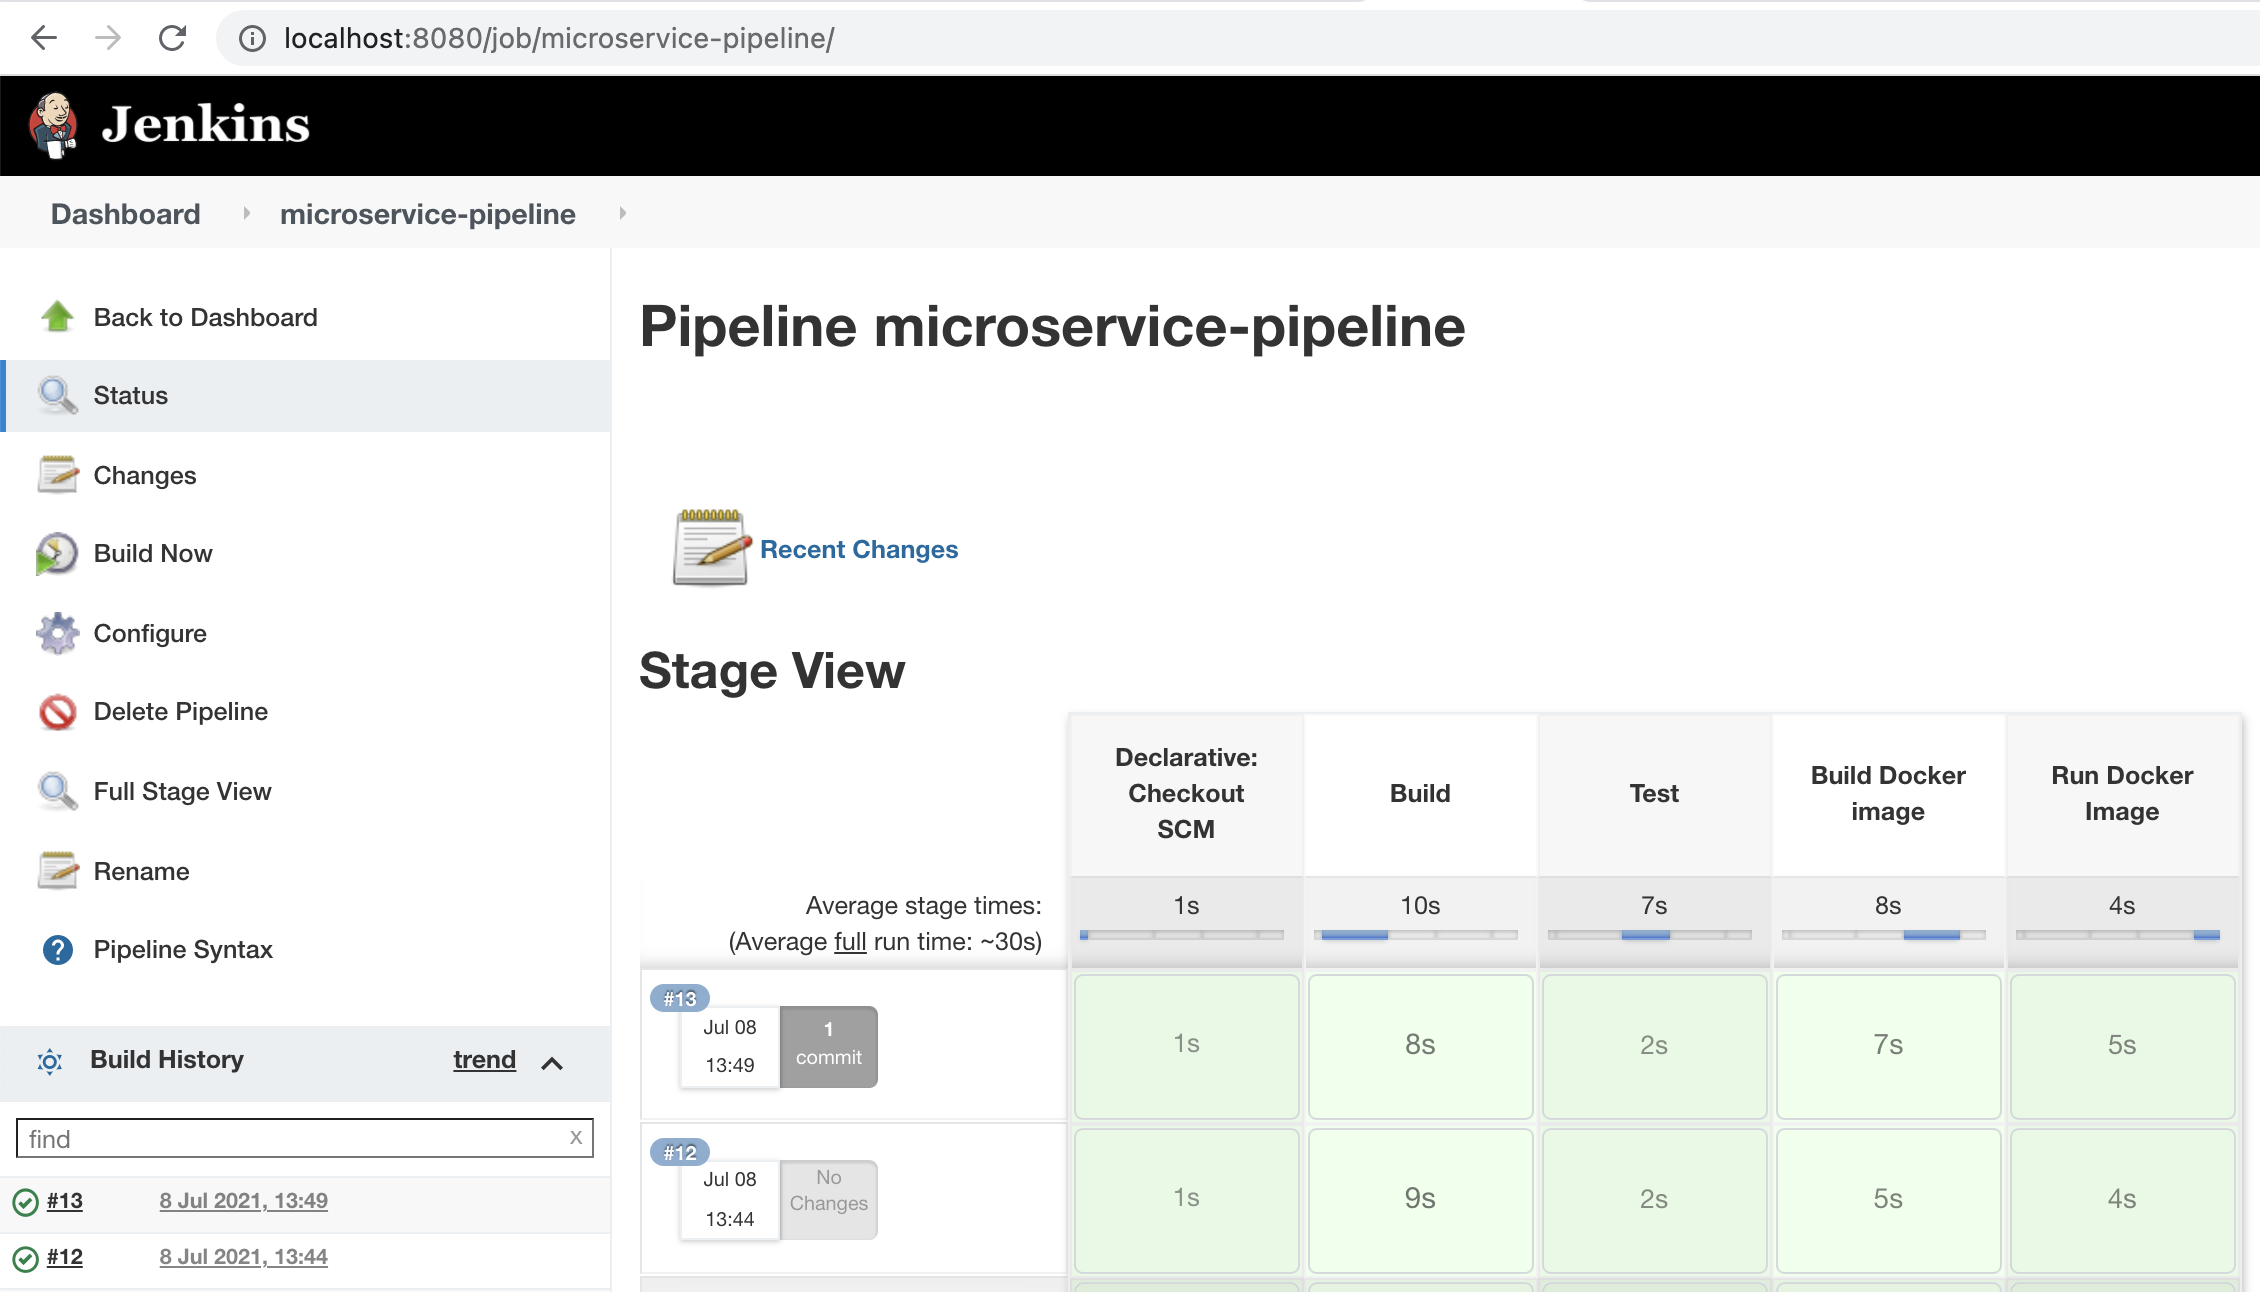
Build stages of Jenkins pipeline
You will see that once the build is successful, docker container for microservices will be running in your local machine. You can verify them using Docker Desktop.
Conclusion
We looked at the typical project setup of spring boot based microservices with best practices. Each microservice project has their own set of build.gradle, Dockerfile, and Jenkinsfile for DevOps CI/CD pipelines. We learned how to automate and test the deployment in our local machine using Gradle, Git, Docker and Jenkins.
Download the complete source code for this example from github/springboot-microservices