Coding N Concepts
 RESTful API documentation using OpenAPI
Documentation is essential when you are building RESTFul APIs in spring boot application. In this tutorial, we’ll learn how to configure the documentation using OpenAPI in Spring Boot.
Overview
SpringDoc OpenAPI generates the API documentation for your Spring Boot APIs by examining the application at runtime to infer API semantics based on spring configurations, class structure and various annotations.
Spring Boot automatically generates the API documentation based on OpenAPI specification, when it finds springdoc-openapi-ui dependency in the classpath. It also use swagger-ui library internally to generate Swagger UI.
Once the configuration is successful, You should be able to see the documentation at following URL:-
| Documentation | URL |
|---|---|
| Swagger UI Page | http://<server>:<port>/<context-path>/swagger-ui/index.html?configUrl=/v3/api-docs/swagger-config |
| OpenAPI Json Docs | http://<server>:<port>/<context-path>/v3/api-docs |
Where,
<server>: The server name or IP<port>: The server port<context-path>: The context path of the application
Project Setup
For initial setup of your Spring Boot project, you should use Spring Initializr. Choose the Spring Web dependency.
Maven Project
You can click the below link to generate a maven project with pre-selected dependencies:-
then add the springdoc-openapi-ui maven dependency to pom.xml which looks like this:-
<?xml version="1.0" encoding="UTF-8"?>
<project xmlns="http://maven.apache.org/POM/4.0.0" xmlns:xsi="http://www.w3.org/2001/XMLSchema-instance"
	xsi:schemaLocation="http://maven.apache.org/POM/4.0.0 https://maven.apache.org/xsd/maven-4.0.0.xsd">
	<modelVersion>4.0.0</modelVersion>
	<parent>
		<groupId>org.springframework.boot</groupId>
		<artifactId>spring-boot-starter-parent</artifactId>
		<version>2.5.1</version>
		<relativePath/> <!-- lookup parent from repository -->
	</parent>
	<groupId>com.example</groupId>
	<artifactId>demo</artifactId>
	<version>0.0.1-SNAPSHOT</version>
	<name>demo</name>
	<description>Demo project for Spring Boot</description>
	<properties>
		<java.version>11</java.version>
	</properties>
	<dependencies>
		<dependency>
			<groupId>org.springframework.boot</groupId>
			<artifactId>spring-boot-starter-web</artifactId>
		</dependency>
		 <dependency>
			<groupId>org.springdoc</groupId>
			<artifactId>springdoc-openapi-ui</artifactId>
		</dependency>

		<dependency>
			<groupId>org.springframework.boot</groupId>
			<artifactId>spring-boot-starter-test</artifactId>
			<scope>test</scope>
		</dependency>
	</dependencies>

	<build>
		<plugins>
			<plugin>
				<groupId>org.springframework.boot</groupId>
				<artifactId>spring-boot-maven-plugin</artifactId>
			</plugin>
		</plugins>
	</build>

</project>
Gradle Project
You can click the below link to generate a gradle project with pre-selected dependencies:-
then add the org.springdoc:springdoc-openapi-ui gradle dependency to build.gradle which looks like this:-
plugins {
  id 'org.springframework.boot' version '2.5.1'
  id 'io.spring.dependency-management' version '1.0.11.RELEASE'
  id 'java'
}

group = 'com.example'
version = '0.0.1-SNAPSHOT'
sourceCompatibility = '11'

repositories {
  mavenCentral()
}

dependencies {
  implementation 'org.springframework.boot:spring-boot-starter-web'
  implementation 'org.springdoc:springdoc-openapi-ui:latest.release'
  testImplementation 'org.springframework.boot:spring-boot-starter-test'
}

test {
  useJUnitPlatform()
}
Define Documentation Properties
Instead of hard coding values in OpenAPI configuration we are going to define some documentation properties in configuration file. We’re using application.yml here. You may also use application.properties file.
application.yml
api:
  info:
    title: Review Service API
    description: API to fetch review details for product
    version: 1.0.0
    terms-of-service: http://example.com/terms/
    contact:
      name: Review Service API Team
      email: apiteam@example.com
      url: http://example.com/team
    license:
      name: Apache 2.0
      url: http://www.apache.org/licenses/LICENSE-2.0.html
springdoc:
  swagger-ui:
    enabled: true
Note that we’ve set the springdoc.swagger-ui.enabled property to true to enable the Swagger UI in our sprint boot project. If you don’t specify the property then default value of this property is true.
Let’s use these properties to define OpenAPIConfig class file.
Define OpenAPIConfig
Let’s create OpenApiConfig configuration class file to customize the OpenAPI and Swagger UI configuration in our Spring boot project.
 1@Configuration
 2@ConditionalOnProperty(name = "springdoc.swagger-ui.enabled", havingValue = "true", matchIfMissing = true)
 3public class OpenApiConfig {
 4
 5    private static final String BEARER_FORMAT = "JWT";
 6    private static final String SCHEME = "Bearer";
 7    private static final String SECURITY_SCHEME_NAME = "Security Scheme";
 8
 9    @Value("${api.info.title: api.info.title}")
10    private String title;
11
12    @Value("${api.info.description: api.info.description}")
13    private String description;
14
15    @Value("${api.info.version: api.info.version}")
16    private String version;
17
18    @Value("${api.info.term-of-service: api.info.terms-of-service}")
19    private String termOfService;
20
21    @Value("${api.info.contact.name: api.info.contact.name}")
22    private String contactName;
23
24    @Value("${api.info.contact.email: api.info.contact.email}")
25    private String contactEmail;
26
27    @Value("${api.info.contact.url: api.info.contact.url}")
28    private String contactUrl;
29
30    @Value("${api.info.license.name: api.info.license.name}")
31    private String licenseName;
32
33    @Value("${api.info.license.url: api.info.license.url}")
34    private String licenseUrl;
35
36    @Bean
37    public OpenAPI api() {
38        return new OpenAPI()
39            .schemaRequirement(SECURITY_SCHEME_NAME, getSecurityScheme())
40            .security(getSecurityRequirement())
41            .info(info());
42    }
43
44    private Info info() {
45        return new Info()
46            .title(title)
47            .description(description)
48            .version(version)
49            .contact(new Contact().name(contactName).email(contactEmail).url(contactUrl))
50            .license(new License().name(licenseName).url(licenseUrl));
51    }
52
53    private List<SecurityRequirement> getSecurityRequirement() {
54        SecurityRequirement securityRequirement = new SecurityRequirement();
55        securityRequirement.addList(SECURITY_SCHEME_NAME);
56        return List.of(securityRequirement);
57    }
58
59    private SecurityScheme getSecurityScheme() {
60        SecurityScheme securityScheme = new SecurityScheme();
61        securityScheme.bearerFormat(BEARER_FORMAT);
62        securityScheme.type(SecurityScheme.Type.HTTP);
63        securityScheme.in(SecurityScheme.In.HEADER);
64        securityScheme.scheme(SCHEME);
65        return securityScheme;
66    }
67}
Note some important points of our OpenAPIConfig class file:
@Configurationannotation is used to auto scan this class file.@ConditionalOnPropertyannotation is used to load theOpenAPIConfigbean in spring context based onspringdoc.swagger-ui.enabledproperty flag.
Security Scheme
OpenAPIConfig Line 39: .schemaRequirement(SECURITY_SCHEME_NAME, getSecurityScheme()) is used to facilitate security requirement.
(You can comment this line if you don’t have such requirement.)
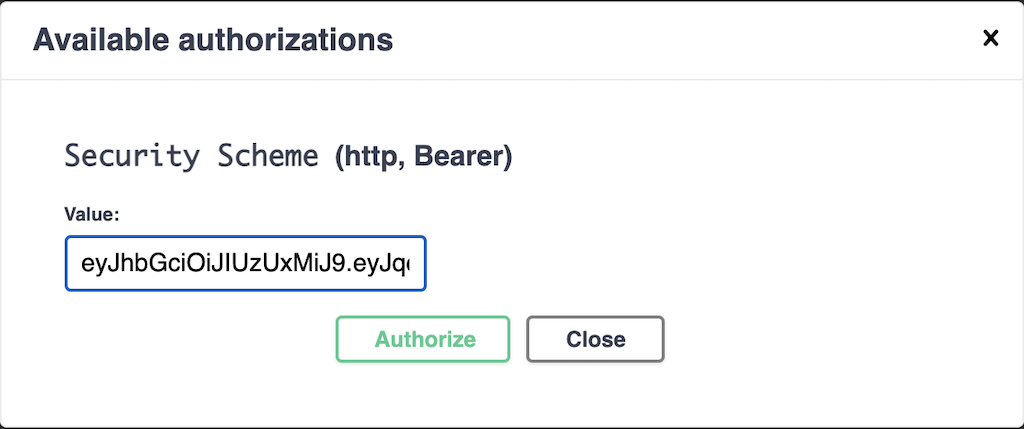
This creates an  button in Swagger UI which opens a dialog
 Available authorizations on click, where you can input access-token for e.g. JWT Token and click Authorize. Once submit, token is passed in Authorization header of each API request, which you execute from Swagger UI.
Verify Swagger UI
That’s it. Now define some REST Controllers in your spring boot project to expose API endpoints and start your spring boot application. You will be able to see Swagger UI something like this:-
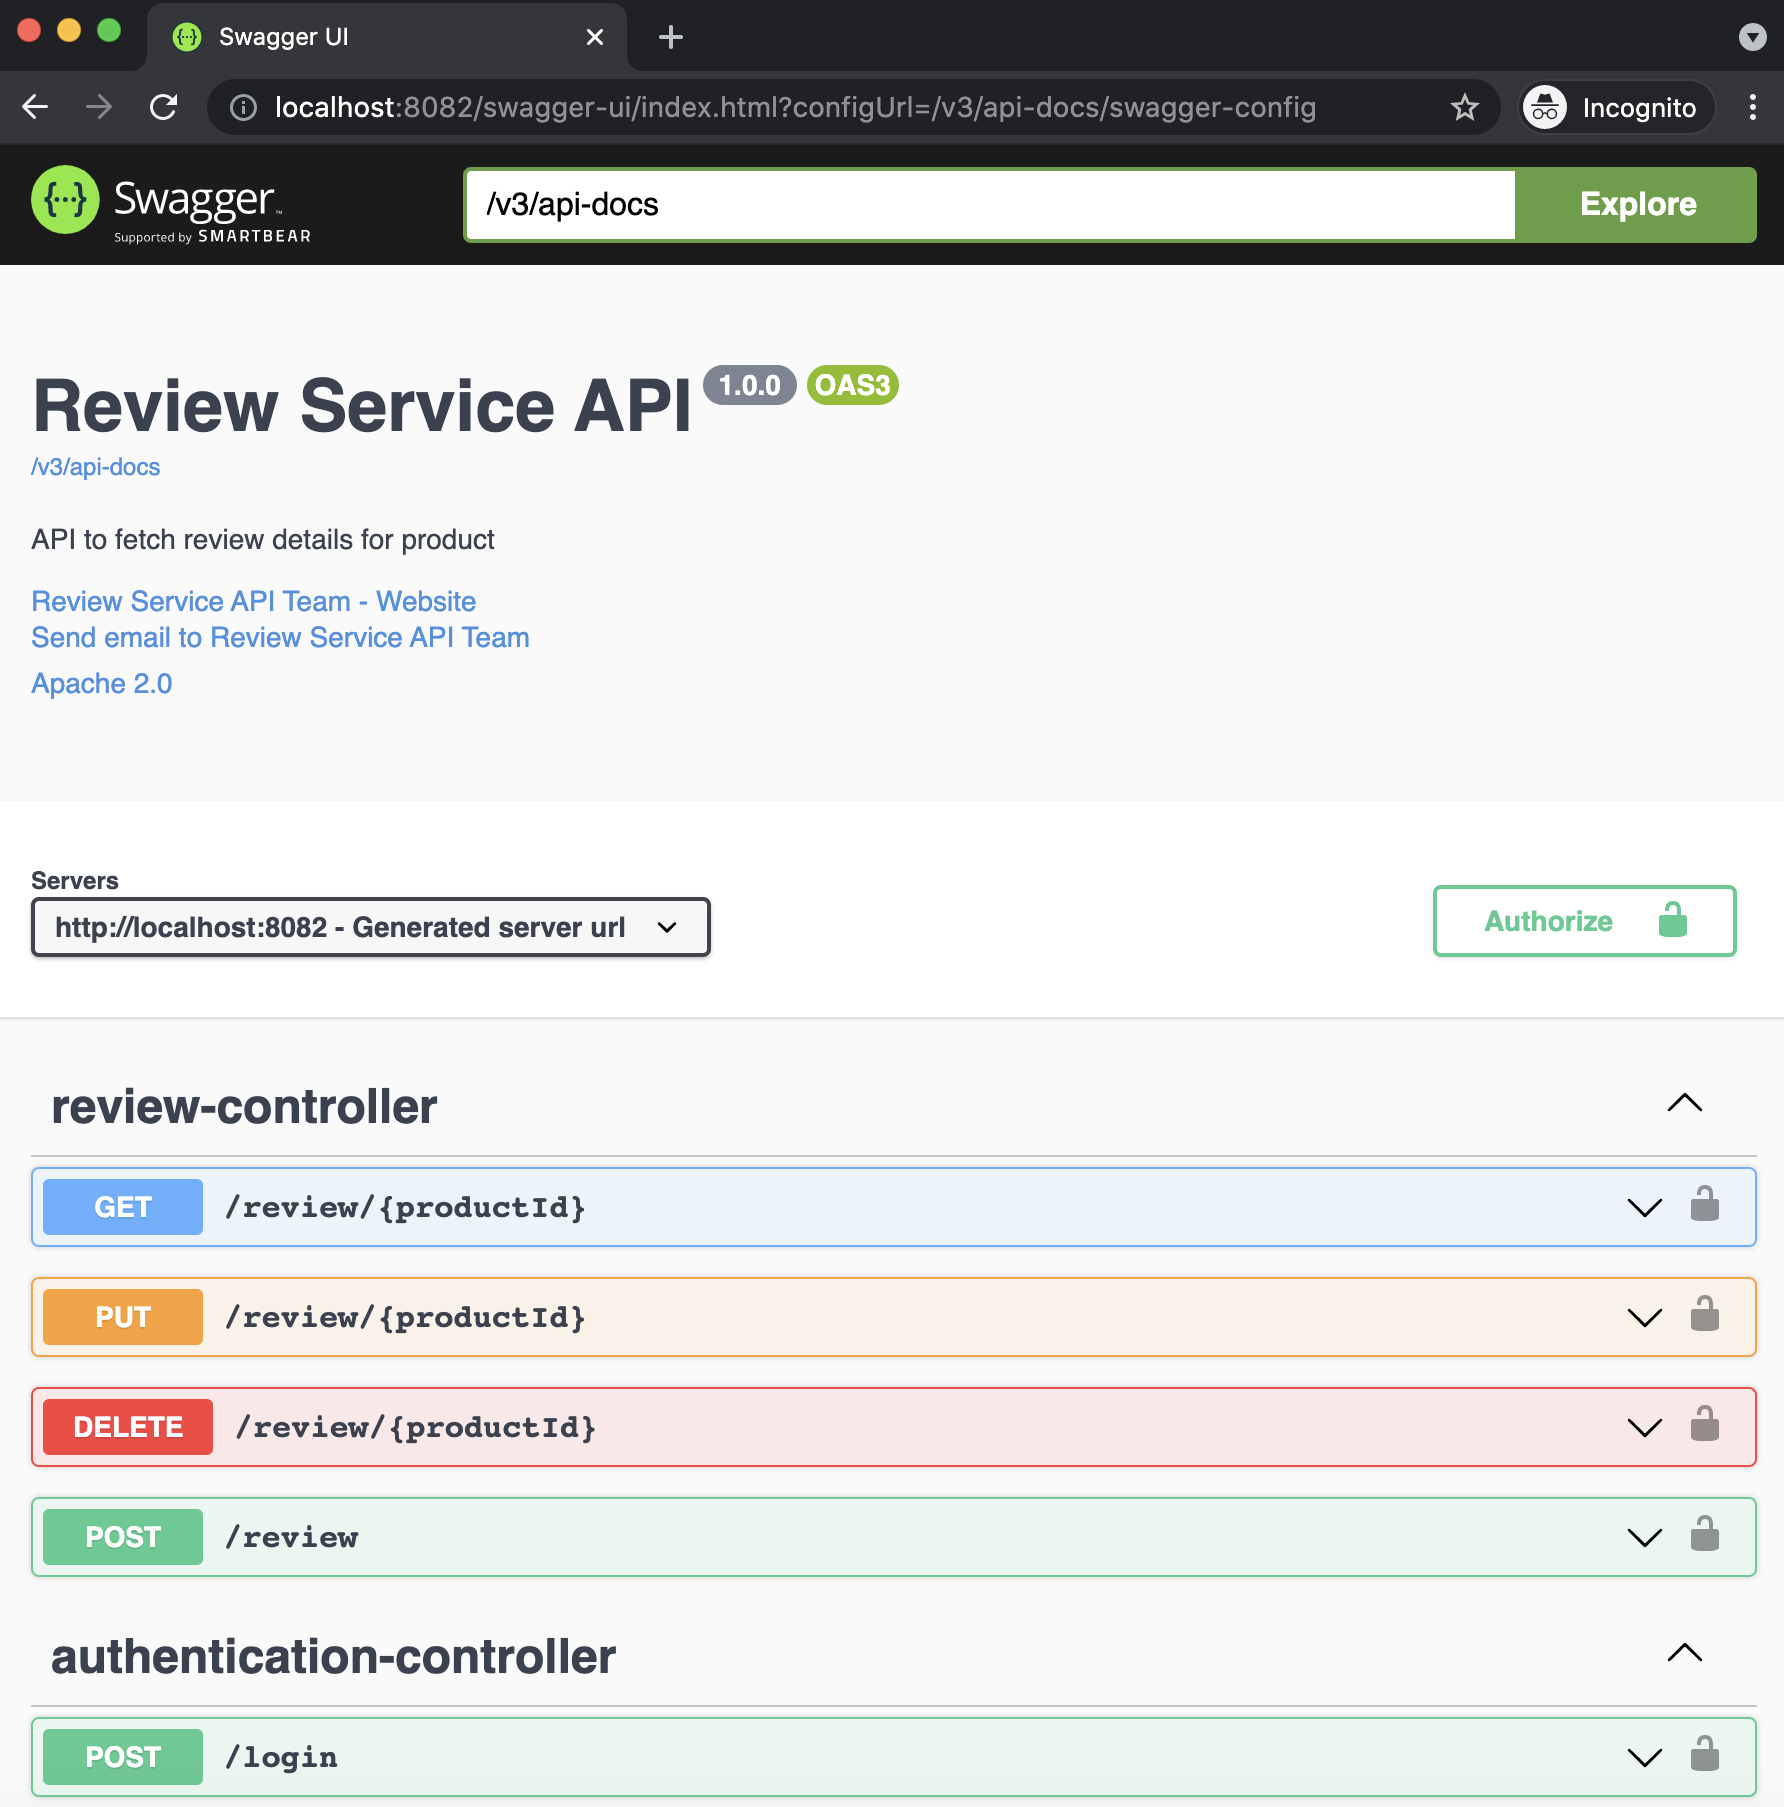
Swagger UI at landing page
By default, Swagger UI is located at http://<server>:<port>/swagger-ui/index.html?configUrl=/v3/api-docs/swagger-config if no server.servlet.context-path is specified.
If you want to load Swagger UI at landing page of your microservice i.e. http://<server>:<port> then use this property:-
springdoc:
  swagger-ui:
    path: /   # Redirect http://localhost:8080 to http://localhost:8080/swagger-ui/index.html?configUrl=/v3/api-docs/swagger-config
Turn off Swagger UI in Production
Swagger UI is very convenient for development purpose. However we generally turn it off in production environment due to security concerns.
You can disable the Swagger UI in production by setting property springdoc.swagger-ui.enabled to false.
application-prod.properties
springdoc.swagger-ui.enabled = true


application-prod.yml
springdoc:
  swagger-ui:
    enabled: true


command-line parameter
$ java -jar -Dspringdoc.swagger-ui.enabled=false spring-boot-app-1.0.jar

or

$ java -jar spring-boot-app-1.0.jar --springdoc.swagger-ui.enabled=false
Download the complete source code from github